FunnelFlux
The Ultimate Guide to Affiliate Marketing Tracker (2020 Updated) + Review
Tracking has always been my favorite part in affiliate marketing. Opening my FunnelFlux and seeing the green numbers make my day.
Affiliate marketing is a very noisy industry. No matter how much you know, it will always be filled with noise. It is also a rapidly changing market.
If you have no experience with affiliate marketing, I strongly advise you to read my insanely detailed step-by-step guide on how to start affiliate marketing in 2020.
Anyone who has worked in affiliate marketing before knows the importance of a tracker. To my surprise, some affiliates still do not use any kind of tracker.
You know the old saying:
You better track your campaigns or I will kick your a**
Ok, I just came up with that.
The point is – If you are serious about affiliate marketing, you must track every aspect of your affiliate campaign. It will blow your mind how much you can optimize and increase your profit just by tracking.

Introduction to FunnelFlux
I understand a tracker can be a bit expensive for the new affiliate marketer. However, if you aren’t ready to invest, don’t expect profit. Simple as that.
Having been in the industry for some time, I’ve come across some affiliate networks that realized the importance of the tracking tool and developed their own.
AdCombo and Mobidea are good examples. They have developed their own internal tracking tools, which affiliates can use 100% free. This is a good option if you are just starting out.
For me, I still prefer a third-party tracker. The big players in the market at the moment are:
Today, I am going to show you how to use one of my favorite trackers – FunnelFlux. I also believe it is the easiest one to use if you are starting out.
To put it simply, FunnelFlux is a visual tracker. You’ll understand when you use it. You don’t have to know to code, server s***, or all this nonsense technical stuff.
It was built by Zeno, one of the founders of the Stack That Money Forum. He is also the guy who teaches 6WAMC. Zeno is an awesome affiliate marketer who has helped thousands of affiliate marketers for years through STM.
Here is a video by Zeno showing an overview of FunnelFlux:
Self-hosted Vs. Managed FunnelFlux
Let’s explain the difference.
A – Self-hosted FunnelFlux
This means you will have to install the tracker on your server. You will need to buy a dedicated server or Virtual Private Server (VPS) to do so.
This option is good if you (or your team) understand the technicality behind servers and how to run and maintain a server.
FunnelFlux will help you by offering a deployment manager service through their dashboard.
They also offer free installation and deployment if you purchase a server from the following host companies:
Vultr
Linode
DigitalOcean
Note the following minimum requirement of the server you buy:
- 2 virtual cores (i.e. 2 vCPU)
- 2 GB of RAM
- 45 GB of SSD disk storage
Here is a step-by-step video on how to install FunnelFlux on your server:
If you choose to buy a server from Vultr, here is a quick guide on how to install FunnelFlux on Vultr.
If you choose DigitalOcean, then follow this guide: How to Install FunnelFlux on DigitalOcean.
Any other server from other host companies will be very similar. However, you can always reach out to FunnelFlux support if you need to.
Is the self-hosted tracker good for you?
If you are a technical person who understands servers, then yes. Also, if you want to have 100% control over how the tracker is configured, then yes too. You will have control of all the tracking data.
Do you want to choose which country (server location) the tracker should be installed in? If yes, it is a good option for you too.
However, if you are starting out and want to learn more about affiliate marketing, then it is a big NO-NO.
I tried it once and honestly did not like it that much. I’m not a fan of technical stuff. I prefer investing my time and energy into finding profitable campaigns and making money.
We should leave the technical part to the technical people. Focus on what matters.
The cost: a flat-rate of $99 per month. But wait! You’re an AffiliateGhost reader and should get special treatment. Sign up here, and you’ll get the following:
The first month for only $1! Try it and if you don’t like it – well, you only lost a buck!
Lifetime 10% off per month
Your plan will also include unlimited traffic. In other words, you will not get charged more even if you get 10M visitors per hour. However, do check the server capacity with your host.
B – Managed tracker
You don’t have to worry about any server or set up with a managed tracker. FunnelFlux support will literally do everything for you.
Think of it as a self-hosted tracker that’s installed and managed by the FunnelFlux team. They will manage the entire infrastructure and maintain it as well.
Think of it like a well-tuned game running on Playstation/Xbox vs a game running on Windows and dealing with 10 million different hardware and software combinations.
FUNNELFLUX TEAM
Why do I like it?
- No installation headache
- No server maintenance
- Free SSL
- Server location choice (Europe, USA, Asia, etc)
- Automatic tracker updates
I used both self-hosting and managed trackers. I can tell you right now that the managed option is a no-brainer and has saved me a lot of my time.
So what’s the catch?
It is more expensive and does not have a flat-rate price like the self-hosted tracker. There are 4 monthly plans:
If you are starting out, don’t think twice. Get the cheapest one – Flux Micro for $179. As an AffiliateGhost reader, you can get another special treat: Get >> $75 account credit << with the purchase of any managed plan.
Adding Networks, Traffic Sources and Offers at FunnelFlux
To create a campaign on FunnelFlux or any tracker, you will complete the following steps, at a minimum:
- Add an affiliate network
- Add an offer
- Add a landing page (aka lander and pre-lander)
- Set up your postback URL
- Add a traffic source

1 – How to add an affiliate network in FunnelFlux
- Go to Dashboard
- Sources tab, then choose Offer Sources from the dropdown menu
- New Offer Source
- Choose your affiliate network from the template on the top right.
Once you have chosen your affiliate network from top right, all fields should populate automatically.
I would recommend not changing anything here. Just click Save Offer Source, and you are good to go.
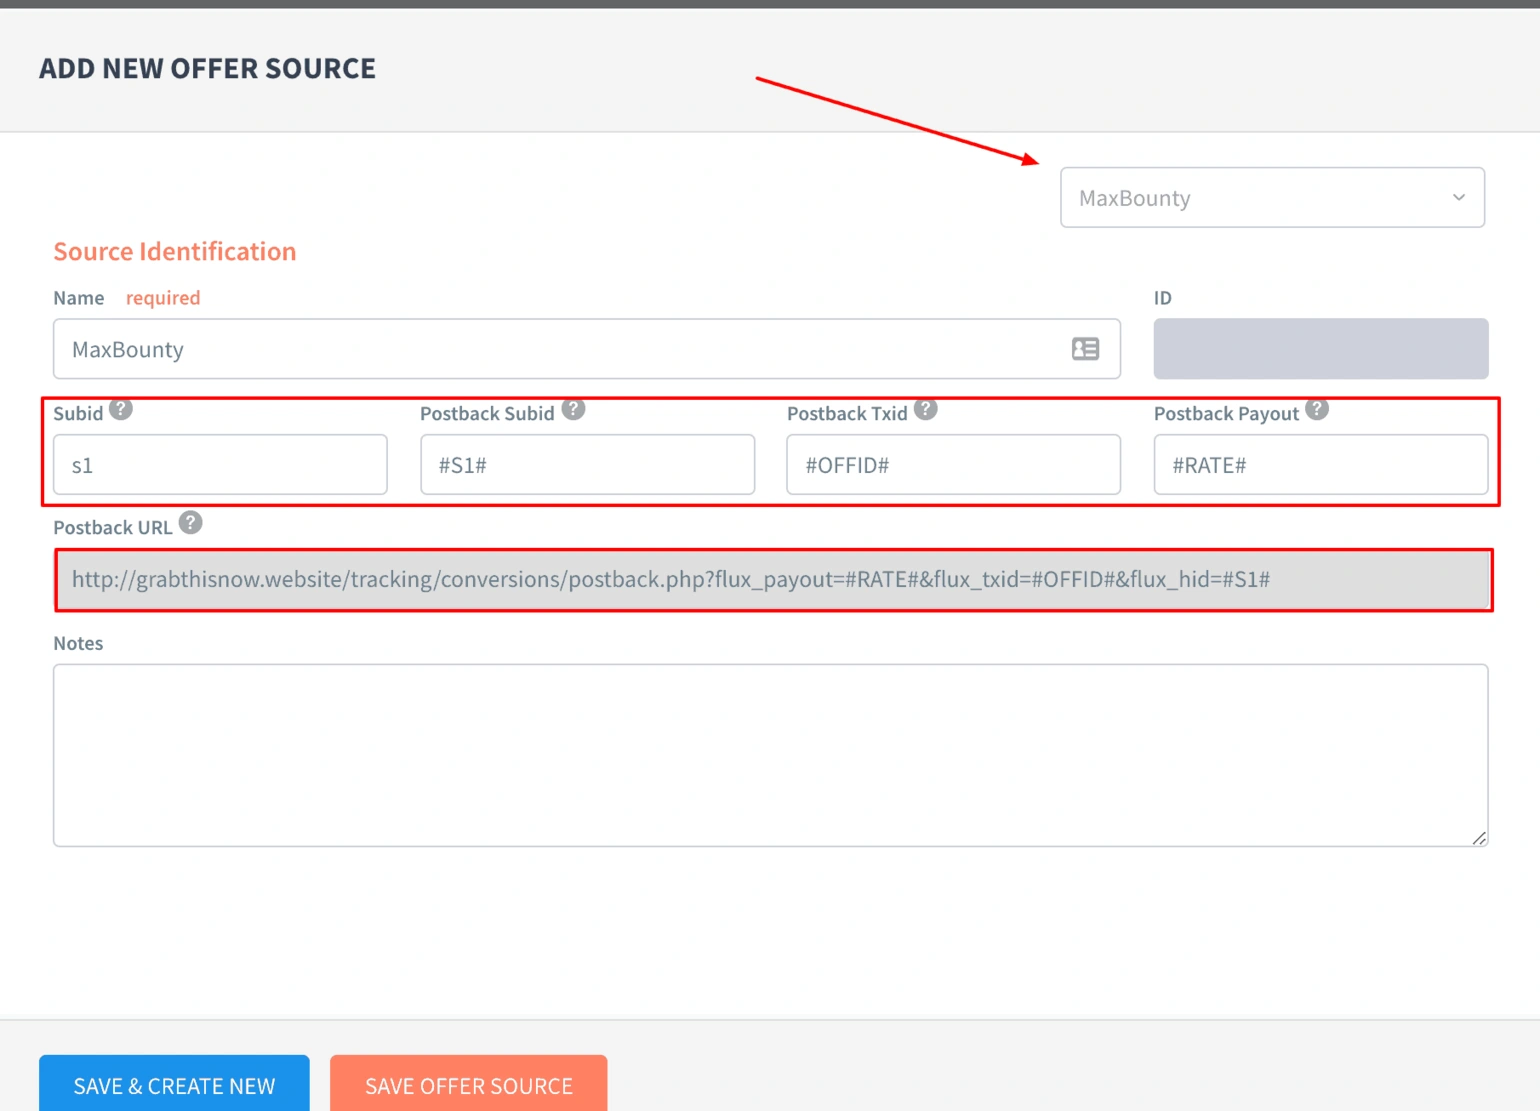
Let’s explain what each field means:
- Subid is the click ID – the most important piece of information.
- Postback Subid is the token for the click ID.
- Postback Txid is the transaction ID, this is important especially if you are running a lead generation offer.
- Postback Payout is the payout amount in USD.
Save the postback URL somewhere. You will need to send it to your affiliate network.
What if you cannot find your affiliate network in the template?
FunnelFlux is consistently adding new affiliate networks. However, there is still a chance that you may not find an affiliate network listed there.
Let’s say you want to add AdCombo, a network that FunnelFlux does not have a template for as of today.
You can google it as “AdCombo Parameter” or “AdCombo Tokens“. You may also ask your affiliate manager. All you need is the following information:
- What is the click ID for AdCombo?
- What is the payout ID for AdCombo?
The click ID is {clickid}, while payout is {revenue}. So all you need to do is add this information to your FunnelFlux.
Here you go..
As you can see, you simply add the value of the click ID (without brackets) in the Subid, the value of the click ID (with brackets) in Postback Subid, and finally the value of revenue (with brackets) in Postback Payout.
Note: Some affiliate networks have their parameters in the form of #clickid#. In this case, you would use #value# and not brackets.
2 – How to add an offer in FunnelFlux
Make sure you have completed Step # 1 first of adding an affiliate network, otherwise this next step will not work.
There is basic information to be filled in, such as the offer name, the payout, category, etc. However, the most important piece is the offer URL. You should be able to get this URL from your affiliate network. And then click Save.
3 – How to add a landing page (aka lander and pre-lander) in FunnelFlux
It is very similar to Step 2 (adding an offer).
I am assuming you have hosted your landing page somewhere first. If you are a newbie, however, and need to know how to get and host a landing page, read this section now.
Here you go..
The same thing goes here; information about the landing page name, category, etc. The most important thing here is the landing page URL.
4 – How to set up your postback URL
Remember the postback URL you saved earlier? Hmm, you’ve lost it!
Ok, no worries. I will tell you how to get it back any time you need it:
Go to Offer Source under Sources in the top bar at FunnelFlux.
You will see a list of all the networks you have added.
Click on the edit button beside the network that you want to get the postback URL for. For example, Mobidea.
And that is the postback URL. You will need to go to your network and post the postback URL over there. Most of the network has an option for global postback URL, so that you can set it once and forget it.
You can also ask your affiliate manager if their network supports global postback URL.
5 – How to add a traffic source in FunnelFlux
FunnelFlux, once again, makes it so easy for you to add as many traffic sources as you want. They also have pre-defined templates for popular traffic sources.
Just choose the traffic source name, and all fields will populate automatically.
If you cannot find the traffic source you are using in the template section, you can google it or ask your account manager to provide it. There is a cool website I use to find most of the tokens. Here you go: https://trackingtokens.com/
For instance, if you search “PropellerAds Token”, you will get a list of token names in a second.

Creating a Campaign in FunnelFlux
This part is the most fun and is my favorite. I keep creating campaigns day and night. Sometimes it feels like a game! Boy oh boy, it is a good one!
This is what the foundation of creating a campaign looks like.
By right clicking anywhere in the black area, you can add any of the following elements:
- Offer – The one that you have already added or any new one.
- Landing Page – You should have added this one too.
- External URL – For example, you want to send people to your website or any other pages.
- Rotator – If you want to rotate between multiple offers/landing pages or any type of node, simply add a rotator node between items. It will spilt the traffic based on the percentage you set up. In other words, it is A/B testing.
- Condition – For example, if the traffic is from Singapore, it goes to offer 1, but if the traffic is from a mobile phone, it goes to offer 2. Use your imagination – the sky is the limit.
- Advance – Where you obviously add the advance stuff, like JavaScript and PHP codes. For example, use a code to filter bots traffic before it gets to your landing page.
Here is a video where I go over creating a campaign quickly with multiple landing pages, offers, rotators and conditions.
You can create unlimited campaigns with any plan in FunnelFlux.
After you save your campaign, right-click on any node you want to send traffic to – ideally on the first one – then choose Send Traffic Here.
You will then see a popup asking to choose one of your traffic sources (the ones you have added previously).
And finally here is your campaign URL.
Save the campaign link. It is the link you will use in the traffic source and send traffic to. Make sure you test it first before you submit to any source.
Understanding Links in FunnelFlux
Like any other tracker, FunnelFlux has an important link structure that you must know about.
There are two main types of links:
- System links
- Stored links
What are the system links?
As you can see from its name, these are system-generated links. Let’s explain one by one.
-> System Links | Funnel URL
This first section is similar to what we have just explained above. It is another way to get any campaign URL you have.
Funnels’ Action Clicks URL.
The next section is related to the URL you use inside your funnels and / or landing pages.
It should be in the form of https://YOURWEBSITE/?flux_action=ACTION-NUMBER
What is Funnels’ Action Clicks URL anyway?
This is the URL you can use on your landing pages to redirect visitors to your funnels’ paths. You can have up to 64 Action Click URLs placed on one landing page.
So if your landing page or your funnel has only one offer (or one path), the URL in your landing page should read like this: https://YOURWEBSITE/?flux_action=1
If you have 2 offers or paths, you should have 2 URLs as follows:
- https://YOURWEBSITE/?flux_action=1
- https://YOURWEBSITE/?flux_action=2
And so on. I think you got the point.
- -> System Links | Conversion Postback URL
This is the Postback URL to use to register a conversion from a distant server, usually an affiliate network you are working with.
- flux_hid: This field is mandatory, you must replace its value with the Hit ID that led to the conversion.
- flux_txid: This field is optional. By using multiple Transaction IDs, you can register several conversions for one single Hit ID.
- flux_payout: This field is optional. If you leave it empty, the payout that you have setup in your Flux Offer will be used.
This is a very important URL. If something is not right, you will probably lose conversions.
I cannot stress this enough. Make sure you do a testing conversion with the affiliate network after you provide them the postback URL. You do not want to lose money!
It should be in the form of: https://YOURWEBSITE/tracking/conversions/postback.php?flux_payout=REPLACE&flux_txid=REPLACE&flux_hid=REPLACE
This most important field is flux_hid. It is the Hit ID.
Check with your affiliate network to replace the above values “REPLACE” with the network tokens.
-> System Links | Conversion iFrame
It is another form of postback URL. This one is usually used when you promote your own offer or your affiliate network provides this function.
AdCombo, TerraLeads, Leadbit and many other affiliate networks provide such a feature.
- flux_pix: This is a pixel ID, it makes the conversion event unique and should be used if you have multiple offers within the same funnel to prevent conflicts (e.g. cross-sells, up-sells, sequential offer flows).
- flux_hid: The converting hit ID may be inserted here if you wish to override it with a specific value.
- flux_txid: Optional transaction ID
- flux_payout: Optional payout, which will override the default set in your offer configuration.
-> System Links | Conversion Pixel
This is the pixel to use to register a conversion directly from visitors’ computers. It is usually used when you promote your own offers and/or have the possibility to place the pixel on the Thank You pages of your offers.
- flux_pix: This is a pixel ID, it makes the conversion event unique and should be used if you have multiple offers within the same funnel to prevent conflicts (e.g. cross-sells, up-sells, sequential offer flows).
- flux_hid: The converting hit ID may be inserted here if you wish to override it with a specific value
- flux_txid: Optional transaction ID
- flux_payout: Optional payout, which will override the default set in your offer configuration
FunnelFlux recommends using Conversion iFrame over the Pixel one.
-> System Links | Clickbank Instant Notifications
As you can see from the title, this section is related to Clickbank. You will find your Secret Key you need to integrate with Clickbank.
? System Links | ClickFunnels Webhook
In case you are using ClickFunnel, this is the Webhook URL you have to add to your ClickFunnels‘ funnel settings.
By the way, it is an awesome tool. If you do not have it, you should get it now! Try the 14-day free trial and build as many landing pages as you want.
That’s it for system links.
What are the Stored Links?
These are links that you add, kind of like shortcuts. I doubt you will use them when you starting out. They are like a lazy way to create funnels.
Anyway, here is how FunnelFlux officially explains it:
“Stored links are useful if you need to use a certain link often and would like to make it easier to access, or if you want to track traffic to a simple page and don’t want to create a funnel just to do this.”
You can read more about stored links here.
Summary
That is pretty much it. Is there anything else you would like to know about FunnelFlux? Let me know in the comment section below.
Share the Love
If you found this post useful, please let others know about it by sharing it.